> ## Documentation Index
> Fetch the complete documentation index at: https://bytebeam.io/docs/llms.txt
> Use this file to discover all available pages before exploring further.
# Linux Generic
> Learn how to efficiently integrate uboot as the bootloader for your device with this comprehensive document. From partition schema creation to switching logic implementation, this guide covers it all. Discover the steps to generate the boot.scr file, download uplink binary and setup scripts.
# Overview
This guide shows how to setup a generic Linux device to connect to Bytebeam. We assume you are using u-boot for the bootloader. If you are using a different bootloader please get in touch with us at [support@bytebeam.io](mailto:support@bytebeam.io) and we would be happy to guide you through the process.
# Partition Schema
Create the following partitions on the device
Partition 1 - Boot partition of size around 100MB.
Partition 2 - Root partition 1 (contains rootfs of Linux distro).
Partition 3 - Root partition 2 (of size same as Root partition 1).
Partition 4 - Download partition (to store application data)
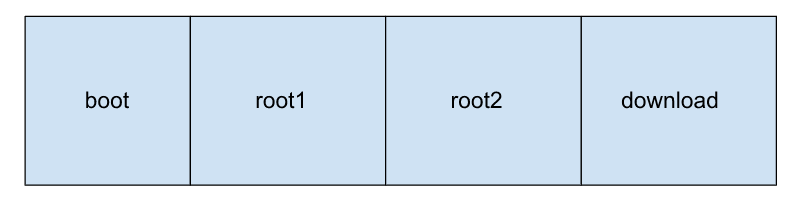 At any given point in time either "Partition 2" or "Partition 3" will be the active rootfs partition, and the other partition is referred to as the inactive partition. Data/Download partition is where the persistent files are stored. During kernel & rootfs updates, the contents of inactive partitions are replaced with the new rootfs.
To begin with setup your existing rootfs into root partition 1 and point u-boot to boot into this partition. Once you have booted into partition 1:
1. Mount the boot partition at /uboot.
2. Mount the root partition 2 at /mnt/next\_root.
3. Mount the download partition 2 at /mnt/download.
# Customizing u-boot for OTAs
Bytebeam uses uboot as the bootloader in order to support rollback feature, during rootfs updates. U-boot can be configured with the help of a boot script called boot.scr.
## Root Switch Logic
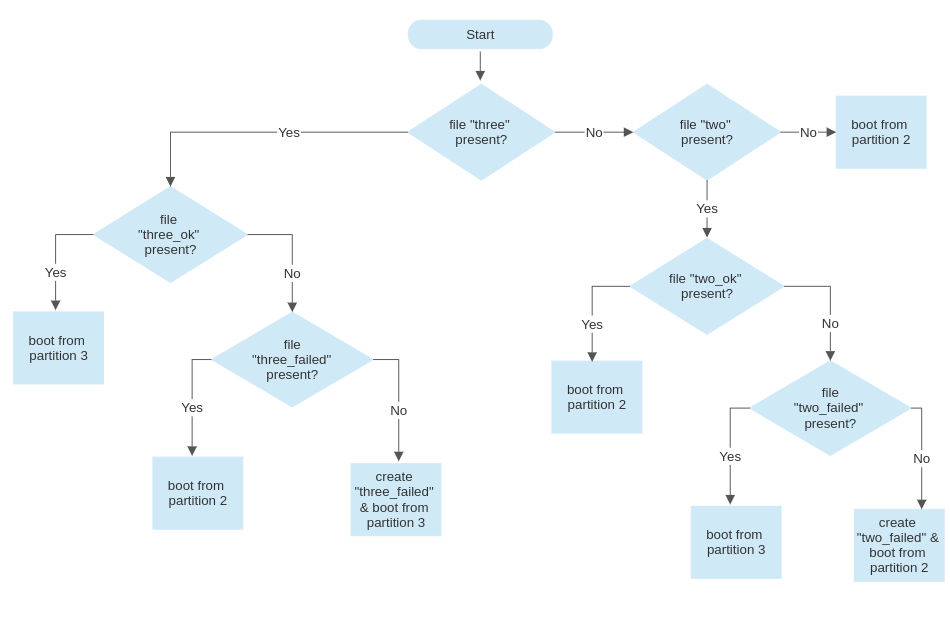
This section explains the workings of u-boot for choosing the right partition to boot from. Understanding this section is required to be able to troubleshoot any issues you may face.
At a high level, we configure u-boot to look for a specific file in the boot partition to know which partition to boot form. For example, if file "two" is present, uboot boots from partition 2, and if file "three" is present, uboot boots from partition 3. The following flowchart explains the Root Switch logic in detail.
At any given point in time either "Partition 2" or "Partition 3" will be the active rootfs partition, and the other partition is referred to as the inactive partition. Data/Download partition is where the persistent files are stored. During kernel & rootfs updates, the contents of inactive partitions are replaced with the new rootfs.
To begin with setup your existing rootfs into root partition 1 and point u-boot to boot into this partition. Once you have booted into partition 1:
1. Mount the boot partition at /uboot.
2. Mount the root partition 2 at /mnt/next\_root.
3. Mount the download partition 2 at /mnt/download.
# Customizing u-boot for OTAs
Bytebeam uses uboot as the bootloader in order to support rollback feature, during rootfs updates. U-boot can be configured with the help of a boot script called boot.scr.
## Root Switch Logic
This section explains the workings of u-boot for choosing the right partition to boot from. Understanding this section is required to be able to troubleshoot any issues you may face.
At a high level, we configure u-boot to look for a specific file in the boot partition to know which partition to boot form. For example, if file "two" is present, uboot boots from partition 2, and if file "three" is present, uboot boots from partition 3. The following flowchart explains the Root Switch logic in detail.
 ## Generate boot.scr
The above logic needs to be implemented in the boot.scr file. Follow the below steps:
**Step 1:** Download the [u-boot](https://github.com/u-boot/u-boot) source code.
**Step 2:** Create the config. file named boot-cmd.txt. With the help of the "Root Switch" logic in this file, uboot can boot to the desired root partition. Note that this file depends on the type of the Linux device. Example files(uEnv.txt, rpi-boot-cmd.txt) are provied in the [Github](https://github.com/bytebeamio/uplink/tree/main/scripts) page.
**Step 3:** From the config. file, boot script file boot.scr can be generated by:
```shell theme={null}
cd /path/to/uboot
u-boot/tools/mkimage -A arm64 -O linux -T script -C none -d boot-cmd.txt boot.scr
```
**Step 4:** Place the u-boot binary and boot script in the boot partition of the device.
**Step 5:** Ensure that the fstab has the proper partition configuration.
# Setup uplink and OTA scripts
**Step 1:** Depending on the architecture of the device, the appropriate uplink binary can be downloaded from [this](https://github.com/bytebeamio/uplink/releases) link. Place it in the download partition, rename the binary as uplink, and make it executable.
**Step 2:** Download the setup scripts
```shell theme={null}
# get uplink.service
curl --proto '=https' --tlsv1.2 -sSf -o /mnt/download/systemd/uplink.service https://raw.githubusercontent.com/bytebeamio/uplink/main/scripts/systemd/uplink.service
# get check-root-partition.service
curl --proto '=https' --tlsv1.2 -sSf -o /mnt/download/systemd/check-root-partition.service https://raw.githubusercontent.com/bytebeamio/uplink/main/scripts/systemd/check-root-partition.service
# get config.toml
curl --proto '=https' --tlsv1.2 -sSf -o /usr/local/share/bytebeam/config.toml https://raw.githubusercontent.com/bytebeamio/uplink/main/scripts/config.toml
# get check_root_part.sh
curl --proto '=https' --tlsv1.2 -sSf -o /mnt/download/check_root_part.sh https://raw.githubusercontent.com/bytebeamio/uplink/main/scripts/check_root_part.sh
chmod +x /mnt/download/check_root_part.sh
```
**Step 3:** Add services to systemd
```shell theme={null}
cp /mnt/download/systemd/uplink.service /etc/systemd/system/
cp /mnt/download/systemd/check-root-partition.service /etc/systemd/system/
systemctl daemon-reload
systemctl enable check-root-partition.service
systemctl start check-root-partition.service
```
**Step 4:** Depending on the root partition, create the file "two" or "three" in the boot partition and in the download partition as well.
```shell theme={null}
BOOT=/uboot
touch $BOOT/two
touch /mnt/download/two
```
**Step 5:** Install vim and netcat
```shell theme={null}
sudo apt update
sudo apt install vim -y
sudo apt install netcat -y
```
Boot the device. Ensure that the device has a good internet connection and that the system time is set properly.
## Generate boot.scr
The above logic needs to be implemented in the boot.scr file. Follow the below steps:
**Step 1:** Download the [u-boot](https://github.com/u-boot/u-boot) source code.
**Step 2:** Create the config. file named boot-cmd.txt. With the help of the "Root Switch" logic in this file, uboot can boot to the desired root partition. Note that this file depends on the type of the Linux device. Example files(uEnv.txt, rpi-boot-cmd.txt) are provied in the [Github](https://github.com/bytebeamio/uplink/tree/main/scripts) page.
**Step 3:** From the config. file, boot script file boot.scr can be generated by:
```shell theme={null}
cd /path/to/uboot
u-boot/tools/mkimage -A arm64 -O linux -T script -C none -d boot-cmd.txt boot.scr
```
**Step 4:** Place the u-boot binary and boot script in the boot partition of the device.
**Step 5:** Ensure that the fstab has the proper partition configuration.
# Setup uplink and OTA scripts
**Step 1:** Depending on the architecture of the device, the appropriate uplink binary can be downloaded from [this](https://github.com/bytebeamio/uplink/releases) link. Place it in the download partition, rename the binary as uplink, and make it executable.
**Step 2:** Download the setup scripts
```shell theme={null}
# get uplink.service
curl --proto '=https' --tlsv1.2 -sSf -o /mnt/download/systemd/uplink.service https://raw.githubusercontent.com/bytebeamio/uplink/main/scripts/systemd/uplink.service
# get check-root-partition.service
curl --proto '=https' --tlsv1.2 -sSf -o /mnt/download/systemd/check-root-partition.service https://raw.githubusercontent.com/bytebeamio/uplink/main/scripts/systemd/check-root-partition.service
# get config.toml
curl --proto '=https' --tlsv1.2 -sSf -o /usr/local/share/bytebeam/config.toml https://raw.githubusercontent.com/bytebeamio/uplink/main/scripts/config.toml
# get check_root_part.sh
curl --proto '=https' --tlsv1.2 -sSf -o /mnt/download/check_root_part.sh https://raw.githubusercontent.com/bytebeamio/uplink/main/scripts/check_root_part.sh
chmod +x /mnt/download/check_root_part.sh
```
**Step 3:** Add services to systemd
```shell theme={null}
cp /mnt/download/systemd/uplink.service /etc/systemd/system/
cp /mnt/download/systemd/check-root-partition.service /etc/systemd/system/
systemctl daemon-reload
systemctl enable check-root-partition.service
systemctl start check-root-partition.service
```
**Step 4:** Depending on the root partition, create the file "two" or "three" in the boot partition and in the download partition as well.
```shell theme={null}
BOOT=/uboot
touch $BOOT/two
touch /mnt/download/two
```
**Step 5:** Install vim and netcat
```shell theme={null}
sudo apt update
sudo apt install vim -y
sudo apt install netcat -y
```
Boot the device. Ensure that the device has a good internet connection and that the system time is set properly.