> ## Documentation Index
> Fetch the complete documentation index at: https://bytebeam.io/docs/llms.txt
> Use this file to discover all available pages before exploring further.
# Triggering a New Action
## Overview
In the Bytebeam console, you can initiate actions such as firmware updates, configuration changes, or geofence adjustments by selecting target devices. Below are detailed instructions for triggering an Over-the-Air (OTA) firmware update.
## Steps to Trigger an OTA Update
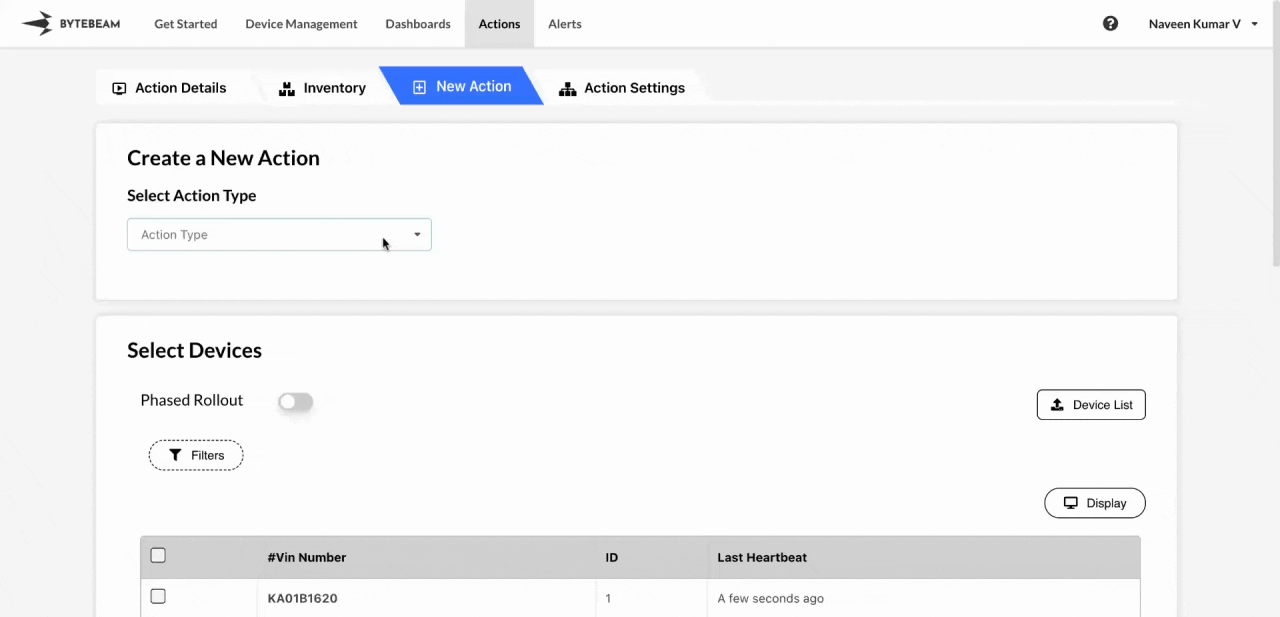
Click on **Actions** tab and navigate to the **New Action** tab located at the top
Locate devices using pagination if necessary. Select individual devices by checking the boxes next to each one, or select all visible devices by using the **Select All** checkbox.
To refine results, apply filters using metadata keys or Device IDs, and then select the filtered devices.
Select the action type as **Update Firmware** from the **Action Type dropdown**. From the options, choose the **Firmware Version** or **Firmware Bundle Version** (if Device Components is enabled) or upload **New Firmware Version**
Select the devices along with other options such as adding [phases](#phase-wise), enabling [auto retry](#auto-retry) or [abort phase](#abort-phase), choosing [timeout](/platform-guide/actions/action-details/device-level-timeouts) duration etc., check the **Summary** section at the bottom and click on **Trigger Action** button.
If using the same filter across multiple phases, make sure the total of all phase fractions equals 100%.
If the device is offline, the action remains in the Initiated state and automatically begins progressing once the device comes online. We also support configurable timeouts and retry mechanisms for all actions..
# Phasewise Execution of Actions
You can schedule the action in multiple phases, with each phase targeting a specific number or percentage of devices. This enables more controlled rollouts and monitoring.
## Phase Triggering Options
**Success Percentage of Previous Phase** - Start the next phase based on a success rate (percentage of devices that completed the previous phase successfully).
**Custom Timing** - Set custom timing for when each phase should begin.
In addition, you can abort a phase if a certain percentage of devices in the previous phase encounter failures.
The **Success Percentage** and **Abort Phase** options become visible starting from the second phase.
## Abort Phase
To enable Abort Phase in any of the phases starting from second phase,
Scroll down to the **Abort Phase** section, enable the **Abort Phase Toggle**.
Enter a percentage value, then trigger the action.
## Auto Retry
Enable Auto Retry to automatically retry failed actions due to temporary issues, eliminating the need for manual retries.
To enable Auto Retry option for any action,
Scroll down to the **Advanced Settings** section, enable the **Advanced Settings Toggle**.
Enable the **Auto Retry Toggle**.
## Device List Upload
This feature is available only in Actions/New Action currently and is not available in Device Management
If you prefer not to select devices manually for each phase, you can upload a CSV file containing the phase details along with associated metadata keys and values for each device.
To use the Device List upload feature:
Scroll down to the **Device List** section and click on it.
Upload a CSV file with all the phase details containing metadata keys and values.
Review the device list generated from the upload, and deselect any devices as needed.
You can proceed with triggering the action on the finalized device list.
# Important Update
When triggering an action on a device with ongoing actions, a warning modal will appear. From this modal, you can choose one of the following options:
**Complete Actions on Selected Devices and Proceed** - This option marks all ongoing actions on the device as complete and immediately starts the new action.
**Proceed Anyway with New Action** - This option queues the new action to begin only once all current actions on the device have either completed or failed.